Mudanças entre as edições de "Projeto Integrador - 2014.2 - No Pain No Gain"
| Linha 105: | Linha 105: | ||
</syntaxhighlight> | </syntaxhighlight> | ||
| − | + | Quando a tela de configuração do tipo de servidor aparecer escolher a opção SITE DA INTERNET. | |
| − | Quando a tela de configuração do tipo de servidor aparecer escolher a opção SITE DA INTERNET. | + | |
| − | No campo, Nome de email do sistema nopainnogain. | + | No campo, Nome de email do sistema: nopainnogain.sj.ifsc.edu.br. |
| + | |||
Arquivo /etc/postfix fazer uma copia do arquivo main.cf | Arquivo /etc/postfix fazer uma copia do arquivo main.cf | ||
| − | |||
| − | # vi main. | + | <code> cp main.cf main.cf.original |
| + | </syntaxhighlight> | ||
| + | |||
| + | <code> | ||
| + | # vi main.cf | ||
| + | </syntaxhighlight> | ||
| − | Apagar tudo que | + | Apagar tudo que está no arquivo e copiar o que está abaixo e alterar apenas o que está em negrito para a configuração. |
| − | < | + | <code> # See /usr/share/postfix/main.cf.dist for a commented, more complete version |
| − | # See /usr/share/postfix/main.cf.dist for a commented, more complete version | + | # Debian specific: Specifying a file name will cause the first |
| − | # Debian specific: | + | # line of that file to be used as the name. The Debian default |
| − | # line of that file to be used as the name. | ||
# is /etc/mailname. | # is /etc/mailname. | ||
#myorigin = /etc/mailname | #myorigin = /etc/mailname | ||
| Linha 153: | Linha 157: | ||
alias_database = hash:/etc/aliases | alias_database = hash:/etc/aliases | ||
myorigin = /etc/mailname | myorigin = /etc/mailname | ||
| − | mydestination = nopainnogain. | + | mydestination = nopainnogain.sj.ifsc.edu.br, hostname_do_seu_servidor, localhost.localdomain, localhost |
| − | relayhost = smtp.nopainnogain. | + | relayhost = smtp.nopainnogain.sj.ifsc.edu.br |
mynetworks = 127.0.0.0/8 [::ffff:127.0.0.0]/104 [::1]/128 | mynetworks = 127.0.0.0/8 [::ffff:127.0.0.0]/104 [::1]/128 | ||
mailbox_size_limit = 0 | mailbox_size_limit = 0 | ||
| Linha 163: | Linha 167: | ||
Salvar o arquivo. | Salvar o arquivo. | ||
| − | Ainda na pasta do postfix (/etc/postfix), criar um arquivo chamado | + | Ainda na pasta do postfix (/etc/postfix), criar um arquivo chamado saslpass com o editor de texto e adicionar a seguinte linha |
| − | < | + | <code> smtp.seudominio.com.brcontadeemail@seudominio.com.br:senhadaconta |
| − | smtp.seudominio.com.brcontadeemail@seudominio.com.br:senhadaconta | ||
</syntaxhighlight> | </syntaxhighlight> | ||
| Linha 172: | Linha 175: | ||
Compilar o arquivo. | Compilar o arquivo. | ||
| − | sudo postmap /etc/postfix/saslpass | + | <syntaxhighlight lang=bash> sudo postmap /etc/postfix/saslpass |
sudo postfix reload | sudo postfix reload | ||
| − | Por | + | </syntaxhighlight> |
| − | < | + | |
| − | # See man 5 aliases for format | + | Por último alterar o arquivo aliases que está em /etc/ adicionando um alias para root o arquivo deve ficar igual ao exemplo abaixo. |
| + | <code> # See man 5 aliases for format | ||
postmaster: root | postmaster: root | ||
root: seu_email@dominio.com.br | root: seu_email@dominio.com.br | ||
</syntaxhighlight> | </syntaxhighlight> | ||
| + | |||
Sair do arquivo e executar os seguintes comandos: | Sair do arquivo e executar os seguintes comandos: | ||
| − | sudo newaliases | + | <syntaxhighlight lang=bash> sudo newaliases |
sudo postfix reload | sudo postfix reload | ||
</syntaxhighlight> | </syntaxhighlight> | ||
Testamos o Email de acordo com o texto, abaixo: | Testamos o Email de acordo com o texto, abaixo: | ||
| − | + | <code> | |
| − | < | ||
> sudo service postfix restart | > sudo service postfix restart | ||
> telnet localhost 25 | > telnet localhost 25 | ||
| Linha 200: | Linha 204: | ||
354 End data with <CR><LF>.<CR><LF> | 354 End data with <CR><LF>.<CR><LF> | ||
subject: Teste | subject: Teste | ||
| − | |||
blabla | blabla | ||
. | . | ||
| Linha 211: | Linha 214: | ||
<h1>'''Dia 25/11/2014'''</h1> | <h1>'''Dia 25/11/2014'''</h1> | ||
| − | |||
| − | |||
''Arquivo: /etc/network/interfaces'' | ''Arquivo: /etc/network/interfaces'' | ||
| − | < | + | <code> |
# The loopback network interface | # The loopback network interface | ||
auto lo eth1 eth1:0 eth0 eth0.10 eth0.20 eth0.30 | auto lo eth1 eth1:0 eth0 eth0.10 eth0.20 eth0.30 | ||
| Linha 239: | Linha 240: | ||
gateway 192.168.1.1 | gateway 192.168.1.1 | ||
| − | #Teste | + | #Teste Vlan1 |
iface eth0.10 inet static | iface eth0.10 inet static | ||
address 192.168.10.2 | address 192.168.10.2 | ||
netmask 255.255.255.128 | netmask 255.255.255.128 | ||
| − | + | vlan-raw-device eth0 | |
| − | #Teste | + | #Teste Vlan2 |
iface eth0.20 inet static | iface eth0.20 inet static | ||
address 192.168.20.2 | address 192.168.20.2 | ||
netmask 255.255.255.128 | netmask 255.255.255.128 | ||
| − | + | vlan-raw-device eth0 | |
| − | #Teste | + | #Teste Vlan3 - Rede Sem Fio |
iface eth0.30 inet static | iface eth0.30 inet static | ||
address 192.168.30.2 | address 192.168.30.2 | ||
netmask 255.255.255.128 | netmask 255.255.255.128 | ||
| − | + | vlan-raw-device eth0 | |
</syntaxhighlight> | </syntaxhighlight> | ||
| + | |||
| + | - Configuramos o '''DNS''': | ||
''Arquivo: /etc/bind/named.conf.local'' | ''Arquivo: /etc/bind/named.conf.local'' | ||
| − | < | + | <code> |
| + | // | ||
| + | // Do any local configuration here | ||
| + | // | ||
| + | |||
| + | // Consider adding the 1918 zones here, if they are not used in your | ||
| + | // organization | ||
| + | //include "/etc/bind/zones.rfc1918"; | ||
| + | |||
//Zona de pesquisa direta | //Zona de pesquisa direta | ||
zone "nopainnogain.sj.ifsc.edu.br" { | zone "nopainnogain.sj.ifsc.edu.br" { | ||
| Linha 268: | Linha 279: | ||
//Zona de pesquisa reversa | //Zona de pesquisa reversa | ||
| − | zone " | + | zone "37.135.200.in-addr.arpa" { |
type master; | type master; | ||
| − | file "/etc/bind/db.192"; | + | file "/etc/bind/db.192"; |
| − | |||
| − | |||
</syntaxhighlight> | </syntaxhighlight> | ||
''Arquivo: /etc/bind/db.nopainnogain.sj.ifsc.edu.br'' | ''Arquivo: /etc/bind/db.nopainnogain.sj.ifsc.edu.br'' | ||
| − | < | + | <code> |
; | ; | ||
; BIND data file for local loopback interface | ; BIND data file for local loopback interface | ||
; | ; | ||
| − | $TTL 604800 | + | $TTL 604800 |
| − | @ IN SOA nopainnogain.sj.ifsc.edu.br. root.nopainnogain.sj.ifsc.edu.br. ( | + | @ IN SOA nopainnogain.sj.ifsc.edu.br. root.nopainnogain.sj.ifsc.edu.br. ( |
| − | + | 2 ; Serial | |
| − | + | 604800 ; Refresh | |
| − | + | 86400 ; Retry | |
| − | + | 2419200 ; Expire | |
| − | + | 604800 ) ; Negative Cache TTL | |
| − | ; | + | ; |
| − | + | IN A 200.135.37.121 | |
| − | + | ||
| − | + | @ IN NS ns.nopainnogain.sj.ifsc.edu.br. | |
| − | + | @ IN A 200.135.37.121 | |
| − | www | + | @ IN AAAA ::1 |
| + | ns IN A 200.135.37.121 | ||
| + | www IN CNAME 200.135.37.121 | ||
</syntaxhighlight> | </syntaxhighlight> | ||
''Arquivo: /etc/bind/db.192'' | ''Arquivo: /etc/bind/db.192'' | ||
| − | < | + | <code> |
| − | |||
; BIND reverse data file for local loopback interface | ; BIND reverse data file for local loopback interface | ||
; | ; | ||
| − | $TTL 604800 | + | $TTL 604800 |
| − | @ IN SOA nopainnogain.sj.ifsc.edu.br. root.napainnogain.sj.ifsc.edu.br. ( | + | @ IN SOA nopainnogain.sj.ifsc.edu.br. root.napainnogain.sj.ifsc.edu.br. ( |
| − | + | 2 ; Serial | |
| − | + | 604800 ; Refresh | |
| − | + | 86400 ; Retry | |
| − | + | 2419200 ; Expire | |
| − | + | 604800 ) ; Negative Cache TTL | |
; | ; | ||
| − | + | @ IN NS ns. | |
| − | + | 121 IN PTR ns.nopainnogain.sj.ifsc.edu.br. | |
| − | + | </syntaxhighlight> | |
| − | + | ||
| + | - Arquivo: ''/etc/resolv.conf'' | ||
| + | |||
| + | <code> | ||
| + | # Dynamic resolv.conf(5) file for glibc resolver(3) generated by resolvconf(8) | ||
| + | # DO NOT EDIT THIS FILE BY HAND -- YOUR CHANGES WILL BE OVERWRITTEN | ||
| + | |||
| + | nameserver 200.135.37.121 | ||
| + | #nameserver 200.135.37.65 | ||
| + | #nameserver 8.8.8.8 | ||
</syntaxhighlight> | </syntaxhighlight> | ||
- Configuramos o '''Apache''': | - Configuramos o '''Apache''': | ||
| − | < | + | <code> |
NameVirtualHost *:80 | NameVirtualHost *:80 | ||
| Linha 331: | Linha 350: | ||
- Configuramos o '''DHCP''': | - Configuramos o '''DHCP''': | ||
| − | |||
| − | |||
''Arquivo: /etc/dhcp/dhcpd.conf'' | ''Arquivo: /etc/dhcp/dhcpd.conf'' | ||
| − | < | + | <code> |
#Tempos de Aluguel | #Tempos de Aluguel | ||
default-lease-time 600; | default-lease-time 600; | ||
| Linha 341: | Linha 358: | ||
#VLAN1 ETH0.10 | #VLAN1 ETH0.10 | ||
| − | subnet 192.168.10.0 netmask 255.255.255.128 { | + | subnet 192.168.10.0 netmask 255.255.255.128 { |
| − | + | range 192.168.10.2 192.168.10.126; | |
| − | + | option broadcast-address 192.168.10.127; | |
| − | + | option routers 192.168.10.1; | |
| − | + | option domain-name-servers 200.135.37.121; | |
| − | # option domain-name "nopainnogain.sj.ifsc.edu.br"; | + | # option domain-name "nopainnogain.sj.ifsc.edu.br"; |
} | } | ||
#VLAN2 ETH0.20 | #VLAN2 ETH0.20 | ||
| − | subnet 192.168.20.0 netmask 255.255.255.128 { | + | subnet 192.168.20.0 netmask 255.255.255.128 { |
| − | + | range 192.168.20.2 192.168.20.126; | |
| − | + | option broadcast-address 192.168.20.127; | |
| − | + | option routers 192.168.20.1; | |
| − | + | option domain-name-servers 200.135.37.121; | |
| − | # option domain-name "nopainnogain.sj.ifsc.edu.br"; | + | # option domain-name "nopainnogain.sj.ifsc.edu.br"; |
} | } | ||
#VLAN3 ETH0.30 - Rede Sem Fio | #VLAN3 ETH0.30 - Rede Sem Fio | ||
| − | subnet 192.168.30.0 netmask 255.255.255.128 { | + | subnet 192.168.30.0 netmask 255.255.255.128 { |
| − | + | range 192.168.30.2 192.168.30.126; | |
| − | + | option broadcast-address 192.168.30.127; | |
| − | + | option routers 192.168.30.1; | |
| − | + | option domain-name-servers 200.135.37.121; | |
| − | # option domain-name "nopainnogain.sj.ifsc.edu.br"; | + | # option domain-name "nopainnogain.sj.ifsc.edu.br"; |
| + | } | ||
| + | |||
| + | #TESTE | ||
| + | #subnet 192.168.110.0 netmask 255.255.255.128 { | ||
| + | # range 192.168.110.2 192.168.110.126; | ||
| + | # option broadcast-address 192.168.110.127; | ||
| + | # option routers 192.168.110.1; | ||
| + | # option domain-name-servers 200.135.37.121; | ||
| + | # option domain-name "nopainnogain.sj.ifsc.edu.br"; | ||
} | } | ||
| Linha 370: | Linha 396: | ||
hardware ethernet 00:1a:4d:97:a4:63; | hardware ethernet 00:1a:4d:97:a4:63; | ||
fixed-address 200.135.37.121; | fixed-address 200.135.37.121; | ||
| − | + | { | |
| − | |||
</syntaxhighlight> | </syntaxhighlight> | ||
| Linha 378: | Linha 403: | ||
''Arquivo: /etc/default/isc-dhcp-server'' | ''Arquivo: /etc/default/isc-dhcp-server'' | ||
| − | < | + | <code> |
| + | # Defaults for dhcp initscript | ||
| + | # sourced by /etc/init.d/dhcp | ||
| + | # installed at /etc/default/isc-dhcp-server by the maintainer scripts | ||
| + | |||
| + | # | ||
| + | # This is a POSIX shell fragment | ||
| + | # | ||
| + | |||
# On what interfaces should the DHCP server (dhcpd) serve DHCP requests? | # On what interfaces should the DHCP server (dhcpd) serve DHCP requests? | ||
# Separate multiple interfaces with spaces, e.g. "eth0 eth1". | # Separate multiple interfaces with spaces, e.g. "eth0 eth1". | ||
| − | INTERFACES="eth0.10 eth0.20 eth0.30" | + | INTERFACES="eth1 eth1:0 eth0 eth0.10 eth0.20 eth0.30" |
| − | + | ||
#eth0.10 VLAN1 | #eth0.10 VLAN1 | ||
#eth0.20 VLAN2 | #eth0.20 VLAN2 | ||
#eth0.30 VLAN3 - Rede Sem Fio | #eth0.30 VLAN3 - Rede Sem Fio | ||
| + | #eth1:0 IP Secundário | ||
| + | </syntaxhighlight> | ||
| + | |||
| + | Para Teste de funcionalidade do DHCP, utilizamos a configuração, abaixo: | ||
| + | |||
| + | <code> | ||
| + | #TESTE | ||
| + | subnet 192.168.3.0 netmask 255.255.255.0 { | ||
| + | range 192.168.3.100 192.168.3.199; | ||
| + | option broadcast-address 192.168.3.255; | ||
| + | option routers 192.168.3.1; | ||
| + | option domain-name-servers 200.135.37.65; | ||
| + | option domain-name "nopainnogain.sj.ifsc.edu.br"; | ||
| + | } | ||
</syntaxhighlight> | </syntaxhighlight> | ||
| Linha 392: | Linha 439: | ||
- Configurando o '''Webmail''' | - Configurando o '''Webmail''' | ||
| − | < | + | <code> |
instalando | instalando | ||
| Linha 428: | Linha 475: | ||
[[arquivo: Img-7993fef2.png]] | [[arquivo: Img-7993fef2.png]] | ||
| + | <h1>'''Dia 28/11/2014'''</h1> | ||
| − | <h1>'''Dia | + | Na aula de Cabeamento, demos continuidade à parte da infraestrutura do Projeto. |
| + | |||
| + | Segue principais atividades realizadas neste dia: | ||
| + | |||
| + | - Cabeamento que sai do Dslam (Lab. Redes) para o Patch Penel (próximo da Porta), 2 entradas (ADSL + Telefone) e 1 saída (SHDL); | ||
| + | |||
| + | - Duas Fusões de Fibra Óptica na entrada do Dio, (restam outras duas). | ||
| + | |||
| + | [[arquivo: 01_12_2014_19_48_10.jpg]] | ||
| + | |||
| + | [[arquivo: 01_12_2014_19_51_38.jpg]] | ||
| + | |||
| + | [[arquivo: 01_12_2014_19_50_10.jpg]] | ||
| + | |||
| + | - Passagem de Cabo de Fibra; | ||
| + | |||
| + | - Teste em todas tomadas, Rj45 Fêmea. Estão OK; | ||
| + | |||
| + | [[arquivo: 01_12_2014_20_02_59.jpg]] | ||
| + | |||
| + | - Instalação dos espelhos com molduras para as quatro tomadas; | ||
| + | |||
| + | - Fixação da bandeja para CFTV no Ármario. | ||
| + | |||
| + | <h1>'''Dia 01/12/2014'''</h1> | ||
| + | |||
| + | - Escolhemos as configurações do '''Firewall - IPTABLES.''' | ||
| + | |||
| + | Obs: Essa configuração será apenas para consulta. Pois a real ainda não está feita. | ||
| + | |||
| + | <code> | ||
| + | # PLACA DE REDE ETH0 > link de internet operadora 1 | ||
| + | # PLACA DE REDE ETH1 > link de internet operadora 2 | ||
| + | # PLACA DE REDE ETH2 > rede interna | ||
| + | |||
| + | Acesse as configurações padrões e insira esta abaixo: | ||
| + | |||
| + | # vi /etc/network/interface | ||
| + | |||
| + | Exemplo de configuração das placas: | ||
| + | |||
| + | ############INICIO############ | ||
| + | auto lo | ||
| + | iface lo inet loopback | ||
| + | |||
| + | ############link de internet operadora 1############ | ||
| + | auto eth0 | ||
| + | iface eth0 inet static | ||
| + | address XXX.XXX.XXX.XXX | ||
| + | netmask XXX.XXX.XXX.XXX | ||
| + | gateway XXX.XXX.XXX.XXX | ||
| + | |||
| + | ############link de internet operadora 2############ | ||
| + | auto eth1 | ||
| + | iface eth1 inet static | ||
| + | address XXX.XXX.XXX.XXX | ||
| + | netmask XXX.XXX.XXX.XXX | ||
| + | gateway XXX.XXX.XXX.XXX | ||
| + | |||
| + | ############link da rede interna############ | ||
| + | auto eth2 | ||
| + | iface eth2 inet static | ||
| + | address XXX.XXX.XXX.XXX | ||
| + | netmask XXX.XXX.XXX.XXX | ||
| + | gateway XXX.XXX.XXX.XXX | ||
| + | |||
| + | ############FINAL############ | ||
| + | |||
| + | Após as devidas configurações nas placas de redes, temos que baixar todos os pacotes necessários para a | ||
| + | instalação de qualquer programa no sistema, com o usuário administrador “ROOT”, damos o seguinte comando: | ||
| + | |||
| + | # apt-get update && apt-get install vim | ||
| + | |||
| + | Após as atualizações damos inicio a configuração do script do firewall, vamos utilizar um script já pré configurado, | ||
| + | mas antes temos que criar o arquivo e dar as permissões para execução: | ||
| + | |||
| + | # vi /etc/init.d/firewall | ||
| + | |||
| + | Permissões e colocar o script para executar como programa: | ||
| + | |||
| + | # chmod 777 /etc/init.d/firewall | ||
| + | |||
| + | # chmod +x /etc/init.d/firewall | ||
| + | |||
| + | Vamos agora inserir o script pré configurado com o seguinte comando: | ||
| + | |||
| + | # vi /etc/init.d/firewall | ||
| + | |||
| + | Agora vamos inserir o script: | ||
| + | |||
| + | ############INICIO############ | ||
| + | #!/bin/bash | ||
| + | |||
| + | ############INTERFACES DOS LINKS DE INTERNET############ | ||
| + | LINK01="eth0" | ||
| + | LINK02="eth1" | ||
| + | |||
| + | ############INTERFACE DA REDE INTERNA############ | ||
| + | INTERNA="eth2" | ||
| + | |||
| + | ############FAIXA DA REDE INTERNA############ | ||
| + | REDEINTERNA="XXX.XXX.XXX.XXX/XX" | ||
| + | |||
| + | ############IP DA INTERFACE ETH0############ | ||
| + | IP_LINK01="XXX.XXX.XXX.XXX/XX" | ||
| + | |||
| + | ############IP DA INTERFACE ETH1############ | ||
| + | IP_LINK02="XXX.XXX.XXX.XXX./XX" | ||
| + | |||
| + | ############PORTAS LIBERADAS############ | ||
| + | PORTAS_TCP="22,3128,80,21,3390,139,445,443,81,110,587,3389" | ||
| + | |||
| + | ############PORTAS_UDP="53,137,138,30606,3299"############ | ||
| + | PORTAS_INTERNAS="20,21,22,3389,110,143,993,995,25,465,53,85,443,119" | ||
| + | |||
| + | ############PORTA PARA ACESSO REMOTO VIA TS############ | ||
| + | PORTA_TS="3389" | ||
| + | |||
| + | ############PORTA TS DOS SERVIDORES############ | ||
| + | PORTA_TS_SERVIDOR01="XXXX" | ||
| + | |||
| + | ############PORTA PARA ACESSO REMOTO VIA SSH############ | ||
| + | PORTA_SSH_EXTERNO="XXXX" | ||
| + | PORTA_SSH_INTERNO="22" | ||
| + | IP_SERVER_SSH="XXX.XXX.XXX.XXX" | ||
| + | |||
| + | ############IP DO SERVIDOR 01############ | ||
| + | IP_SERVIDOR01="XXX.XXX.XXX.XX" | ||
| + | |||
| + | ############IPS LIBERADOS DO PROXY############ | ||
| + | IPS_LIBERADOS="XXX.XXX.XXX.XXX/XXX.XXX.XXX" | ||
| + | |||
| + | ############SERVIDOR SQUID .SERVIDOR PROXY.############ | ||
| + | IP_SQUID="XXX.XXX.XXX.XXX" | ||
| + | |||
| + | ############INICIO DAS REGRAS############ | ||
| + | |||
| + | ############Inicia as Configurações############ | ||
| + | |||
| + | iniciar(){ | ||
| + | |||
| + | ############Zerando as regras############ | ||
| + | iptables -Z | ||
| + | iptables -X | ||
| + | iptables -F INPUT | ||
| + | iptables -F OUTPUT | ||
| + | iptables -F FORWARD | ||
| + | iptables -F POSTROUTING -t nat | ||
| + | iptables -F PREROUTING -t nat | ||
| + | iptables -F -t nat | ||
| + | iptables -t nat -F | ||
| + | iptables -t mangle -F | ||
| + | echo "Limpando as regras ...................................[ OK ]" | ||
| + | |||
| + | ############Ativa modulos no Kernel############ | ||
| + | modprobe ip_conntrack | ||
| + | modprobe ip_conntrack_ftp | ||
| + | modprobe ip_nat_ftp | ||
| + | modprobe ipt_LOG | ||
| + | modprobe ipt_REJECT | ||
| + | modprobe ipt_MASQUERADE | ||
| + | modprobe ip_tables | ||
| + | modprobe iptable_filter | ||
| + | modprobe nf_conntrack_ipv4 | ||
| + | echo "Modulos Ativados .....................................[ OK ]" | ||
| + | |||
| + | ############CRIA IDA E VOLTA DO ACESSO NAS CHAINS INPUT, OUTPUT E FORWARD############ | ||
| + | iptables -A INPUT -m state --state ESTABLISHED,RELATED -j ACCEPT | ||
| + | iptables -A OUTPUT -m state --state RELATED,ESTABLISHED -j ACCEPT | ||
| + | iptables -A FORWARD -m state --state ESTABLISHED,RELATED -j ACCEPT | ||
| + | |||
| + | ############ATRIBUINDO SEGURANCA############ | ||
| + | echo 1 > /proc/sys/net/ipv4/tcp_syncookies | ||
| + | |||
| + | # Rejeitar requisicao de ICMP Echo destinado a Broadcasts e Multicasts | ||
| + | echo 1 > /proc/sys/net/ipv4/icmp_echo_ignore_broadcasts | ||
| + | |||
| + | ############Proteção Contra IP Spoofing############ | ||
| + | echo 1 > /proc/sys/net/ipv4/conf/all/rp_filter | ||
| + | |||
| + | ############Ativando proteção contra responses bogus############ | ||
| + | echo 1 > /proc/sys/net/ipv4/icmp_ignore_bogus_error_responses | ||
| + | |||
| + | ############Permite o redirecionamento seguro dos pacotes############ | ||
| + | echo 0 > /proc/sys/net/ipv4/conf/all/accept_redirects | ||
| + | |||
| + | ############Protege contra port scanners avançadas############ | ||
| + | iptables -A FORWARD -p tcp --tcp-flags SYN,ACK,FIN,RST RST -m limit --limit 1/s -j ACCEPT | ||
| + | |||
| + | ############Protege contra ping da morte############ | ||
| + | iptables -A FORWARD -p icmp --icmp-type echo-request -m limit --limit 1/s -j ACCEPT | ||
| + | |||
| + | ############Protege contra os ataques do tipo "Syn-flood, DoS, etc"############ | ||
| + | iptables -A FORWARD -p tcp -m limit --limit 1/s -j ACCEPT | ||
| + | |||
| + | ############Logar os pacotes mortos por inatividade############ | ||
| + | iptables -A FORWARD -m limit --limit 3/minute --limit-burst 3 -j LOG | ||
| + | |||
| + | # Protege contra pacotes que podem procurar e obter informacoes da rede interna | ||
| + | iptables -A FORWARD --protocol tcp --tcp-flags ALL SYN,ACK -j DROP | ||
| + | |||
| + | ############Bloqueando traceroute############ | ||
| + | iptables -A INPUT -p udp -s 0/0 -i $INTERNA --dport 33435:33525 -j DROP | ||
| + | |||
| + | ############Proteções contra ataques############ | ||
| + | iptables -A INPUT -m state --state INVALID -j DROP | ||
| + | |||
| + | ############Bloqueia qualquer tentativa de conexão de fora para dentro por TCP############ | ||
| + | iptables -A INPUT -i $INTERNA -p tcp --syn -j DROP | ||
| + | |||
| + | ############Mesmo assim fechar todas as portas abaixo de 32000############ | ||
| + | iptables -A INPUT -i $INTERNA -p tcp --dport :32000 -j DROP | ||
| + | |||
| + | ############Proteções contra ataques############ | ||
| + | iptables -A INPUT -m state --state INVALID -j DROP | ||
| + | |||
| + | ############FIM DA SEGURANCA############ | ||
| + | |||
| + | ############Liberando encaminhamento de pacotes############ | ||
| + | echo 1 > /proc/sys/net/ipv4/ip_forward | ||
| + | |||
| + | ############PREROUTING############ | ||
| + | |||
| + | ############ESTA REGRA LIBERA O IPS DO PROXY############ | ||
| + | iptables -t nat -A PREROUTING -s $IPS_LIBERADOS -p tcp --dport 80 -j ACCEPT | ||
| + | |||
| + | ############REGRA PARA ACESSO VIA TERMINAL SERVER############ | ||
| + | ############SERVIDOR 01############ | ||
| + | iptables -t nat -A PREROUTING -d $IP_LINK01 -p tcp -m tcp --dport $PORTA_TS_SERVIDOR01 -j DNAT --to-destination $IP_SERVIDOR01:$PORTA_TS | ||
| + | |||
| + | ############REGRA PARA ACESSO VIA PROTOCOLO SSH############ | ||
| + | iptables -t nat -A PREROUTING -d $IP_LINK01 -p tcp -m tcp --dport $PORTA_SSH_EXTERNO -j DNAT --to-destination $IP_SERVER_SSH:$PORTA_SSH_INTERNO | ||
| + | |||
| + | |||
| + | ############Regras FORWARD PORTAS LIBERADAS PARA REDE INTERNA############ | ||
| + | iptables -A FORWARD -s $REDEINTERNA -p tcp -m multiport --dports $PORTAS_INTERNAS -j ACCEPT | ||
| + | |||
| + | ############REGRA COMPARTILHAMENTO DOS LINKS############ | ||
| + | |||
| + | ############INTERNET NOS LINKS EXTERNO PARA REDE INTERNA############ | ||
| + | iptables -t nat -A POSTROUTING -o $LINK01 -j MASQUERADE | ||
| + | iptables -t nat -A POSTROUTING -o $LINK02 -j MASQUERADE | ||
| + | echo "Compartilhamento de Internet Ativados ................[ OK ]" | ||
| + | |||
| + | ############REGRAS DE LIBERACAO DE PORTAS############ | ||
| + | |||
| + | ############REGRAS DE LIBERACAO DE PORTAS TCP############ | ||
| + | iptables -A INPUT -p tcp -m multiport --dports $PORTAS_TCP -j ACCEPT | ||
| + | iptables -A OUTPUT -p tcp -m multiport --dports $PORTAS_TCP -j ACCEPT | ||
| + | iptables -A FORWARD -p tcp -m multiport --dports $PORTAS_TCP -j ACCEPT | ||
| + | |||
| + | ############REGRAS DE LIBERACAO DE PORTAS UDP############ | ||
| + | iptables -A INPUT -p udp -m multiport --dports $PORTAS_UDP -j ACCEPT | ||
| + | iptables -A OUTPUT -p udp -m multiport --dports $PORTAS_UDP -j ACCEPT | ||
| + | iptables -A FORWARD -p udp -m multiport --dports $PORTAS_UDP -j ACCEPT | ||
| + | |||
| + | ############FIM LIBERACAO DE PORTAS############ | ||
| + | |||
| + | ############REGRA PARA SERVIDOR PROXY "SQUID SERVIDOR SEPARADO"############ | ||
| + | iptables -t nat -A PREROUTING -i $INTERNA -p tcp --dport 80 -j DNAT --to-destination $IP_SQUID:3128 | ||
| + | |||
| + | ############Manter Conexar estabelecidas############ | ||
| + | iptables -A INPUT -m state --state ESTABLISHED,RELATED -j ACCEPT | ||
| + | iptables -A FORWARD -m state --state ESTABLISHED,RELATED -j ACCEPT | ||
| + | |||
| + | ############Liberando o Trafego na Interface loopback############ | ||
| + | iptables -A INPUT -i lo -j ACCEPT | ||
| + | |||
| + | ############REGRA QUE BLOQUEIA TUDO O QUE NAO ESTA ACIMA############ | ||
| + | echo "Bloqueando tudo que restou.." | ||
| + | iptables -A INPUT -p tcp -j DROP | ||
| + | iptables -A INPUT -p udp -j DROP | ||
| + | iptables -A FORWARD -i $LINK01 -p tcp -j DROP | ||
| + | iptables -A FORWARD -i $LINK01 -p udp -j DROP | ||
| + | iptables -A FORWARD -i $LINK02 -p tcp -j DROP | ||
| + | iptables -A FORWARD -i $LINK02 -p udp -j DROP | ||
| + | |||
| + | |||
| + | ############ | ||
| + | echo "Firewall iniciando!" | ||
| + | } | ||
| + | parar(){ | ||
| + | iptables -F -t nat | ||
| + | } | ||
| + | |||
| + | case "$1" in | ||
| + | "start") iniciar ;; | ||
| + | "stop") parar ;; | ||
| + | "restart") parar; iniciar ;; | ||
| + | *) echo "Use os parâ ou stop" | ||
| + | esac | ||
| + | |||
| + | ############FIM DAS REGRAS############ | ||
| + | |||
| + | OBSERVAÇÂO: | ||
| + | Após configurar o firewall temos que colocar o script para iniciar no boot do sistema com o seguinte comando: | ||
| + | # update-rc.d firewall defaults | ||
| + | |||
| + | </syntaxhighlight> | ||
| + | |||
| + | '''PROGRAMAÇÃO''' | ||
| + | |||
| + | - O aluno Tiago já está adiantando a parte de Programação. | ||
| + | |||
| + | Já estão Prontos: Cadastro + Listagem. | ||
| + | |||
| + | Faltando apenas: Exclusão + Alterar Usuário. | ||
| + | |||
| + | [[arquivo: 01_12_2014_22_07_56.jpg]] | ||
| + | |||
| + | - Instalando/Configurando '''Freeradius''' | ||
| + | |||
| + | <syntaxhighlight lang=bash> | ||
| + | apt-get update && apt-get -y install freeradius freeradius-common freeradius-mysql freeradius-utils libfreeradius2 | ||
| + | |||
| + | mysql -uroot -p -e 'CREATE DATABASE radius; GRANT ALL ON radius.* TO radius@localhost IDENTIFIED BY "PASSWORD";' | ||
| + | |||
| + | mysql -uroot -p radius < /etc/freeradius/sql/mysql/schema.sql | ||
| + | </syntaxhighlight> | ||
| + | |||
| + | Configurando arquivo /etc/freeradius/sql.conf | ||
| + | |||
| + | <code> | ||
| + | # -*- text -*- | ||
| + | ## | ||
| + | ## $Id$ | ||
| + | |||
| + | ################################# | ||
| + | # | ||
| + | # Configuration for the SQL module | ||
| + | # | ||
| + | # The database schemas and queries are located in subdirectories: | ||
| + | # | ||
| + | # sql/DB/schema.sql Schema | ||
| + | # sql/DB/dialup.conf Basic dialup (including policy) queries | ||
| + | # sql/DB/counter.conf counter | ||
| + | # sql/DB/ippool.conf IP Pools in SQL | ||
| + | # | ||
| + | |||
| + | sql { | ||
| + | # | ||
| + | # Set the database to one of: | ||
| + | driver = "rlm_sql_${database}" | ||
| + | # If you are using Oracle then use this instead | ||
| + | acct_table2 = "radacct" | ||
| + | authcheck_table = "radcheck" | ||
| + | authreply_table = "radreply" | ||
| + | |||
| + | groupcheck_table = "radgroupcheck" | ||
| + | groupreply_table = "radgroupreply" | ||
| + | |||
| + | # Table to keep group info | ||
| + | usergroup_table = "radusergroup" | ||
| + | |||
| + | # If set to 'yes' (default) we read the group tables | ||
| + | # -*- text -*- | ||
| + | ## | ||
| + | ## $Id$ | ||
| + | |||
| + | ################################# | ||
| + | # | ||
| + | # Configuration for the SQL module | ||
| + | # | ||
| + | # The database schemas and queries are located in subdirectories: | ||
| + | # | ||
| + | # sql/DB/schema.sql Schema | ||
| + | sql { | ||
| + | # | ||
| + | # Database table configuration for everything except Oracle | ||
| + | acct_table1 = "radacct" | ||
| + | # Allow for storing data after authentication | ||
| + | postauth_table = "radpostauth" | ||
| + | |||
| + | # If set to 'no' the user MUST have Fall-Through = Yes in the radreply table | ||
| + | # read_groups = yes | ||
| + | |||
| + | # Remove stale session if checkrad does not see a double login | ||
| + | deletestalesessions = yes | ||
| + | |||
| + | # Print all SQL statements when in debug mode (-x) | ||
| + | sqltrace = no | ||
| + | sqltracefile = ${logdir}/sqltrace.sql | ||
| + | |||
| + | # number of sql connections to make to server | ||
| + | num_sql_socks = 5 | ||
| + | |||
| + | # number of seconds to dely retrying on a failed database | ||
| + | # connection (per_socket) | ||
| + | connect_failure_retry_delay = 60 | ||
| + | |||
| + | # lifetime of an SQL socket. If you are having network issues | ||
| + | # such as TCP sessions expiring, you may need to set the socket | ||
| + | # lifetime. If set to non-zero, any open connections will be | ||
| + | # closed "lifetime" seconds after they were first opened. | ||
| + | lifetime = 0 | ||
| + | |||
| + | # Maximum number of queries used by an SQL socket. If you are | ||
| + | # having issues with SQL sockets lasting "too long", you can | ||
| + | # limit the number of queries performed over one socket. After | ||
| + | # "max_qeuries", the socket will be closed. Use 0 for "no limit". | ||
| + | max_queries = 0 | ||
| + | |||
| + | # Set to 'yes' to read radius clients from the database ('nas' table) | ||
| + | # Clients will ONLY be read on server startup. For performance | ||
| + | # and security reasons, finding clients via SQL queries CANNOT | ||
| + | # be done "live" while the server is running. | ||
| + | # | ||
| + | #readclients = yes | ||
| + | |||
| + | # Table to keep radius client info | ||
| + | nas_table = "nas" | ||
| + | |||
| + | # Read driver-specific configuration | ||
| + | $INCLUDE sql/${database}/dialup.conf | ||
| + | </syntaxhighlight> | ||
| + | |||
| + | No arquivo /etc/freeradius/radiusd.conf | ||
| + | Descomentar as linhas | ||
| + | |||
| + | <code> | ||
| + | uncomment $INCLUDE sql.conf | ||
| + | uncomment $INCLUDE sql/mysql/counter.conf | ||
| + | </syntaxhighlight> | ||
| + | |||
| + | No arquivo /etc/freeradius/sites-available/default | ||
| + | Descomentar as linhas | ||
| + | |||
| + | <code> | ||
| + | authorize { | ||
| + | accounting { | ||
| + | session { | ||
| + | </syntaxhighlight> | ||
| + | |||
| + | Randomizar os segredos | ||
| + | |||
| + | <code> | ||
| + | sed -i "s/testing123/fznEBkoaZKcJg5VeJFXEwf3L7um4bexPnzLcAY6VAvUBEXBvdReRRDYrbWZJ3Zxl/" /etc/freeradius/clients.conf | ||
| + | </syntaxhighlight> | ||
| + | |||
| + | Adicionar limites de uso e de taxa com o Dicionário FreeRADIUS | ||
| + | |||
| + | <code> | ||
| + | |||
| + | echo -e "\nATTRIBUTE Usage-Limit 3000 string\nATTRIBUTE Rate-Limit 3001 string" >> /etc/freeradius/dictionary | ||
| + | </syntaxhighlight> | ||
| + | |||
| + | Restart Freeradius | ||
| + | |||
| + | <code> | ||
| + | service freeradius restart | ||
| + | </syntaxhighlight> | ||
| + | |||
| + | <h1>'''Dia 02/12/2014'''</h1> | ||
| + | |||
| + | Atividades: | ||
| + | |||
| + | Terminamos as duas Fusões de Fibra Óptica que faltavam. | ||
| + | |||
| + | Instalação do Patch Panel no Armário do Redes: Meios. | ||
| + | |||
| + | Teste nas Fibras Ópticas, estão OK. | ||
| + | |||
| + | <h1>'''Dia 03/12/2014'''</h1> | ||
| + | |||
| + | Tivemos problemas quanto a configuração das Vlans. Mas, já atualizamos o diário. | ||
| + | |||
| + | <h1>'''Dia 04/12/2014'''</h1> | ||
| + | |||
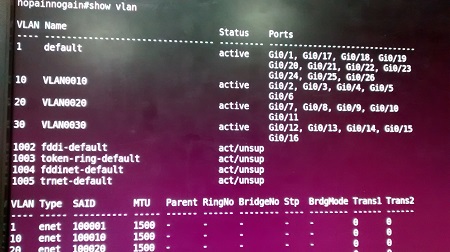
| + | Configuração no Switch Catalyst 2960-S das Vlans. | ||
| + | |||
| + | <h1>'''Dia 05/12/2014'''</h1> | ||
| + | |||
| + | Continuamos configurando as Vlans no Switch Catalyst 2960-S. | ||
| + | |||
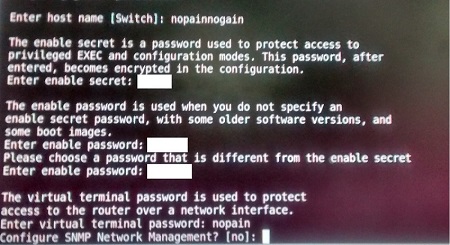
| + | Configurando Senhas de Acesso: | ||
| + | |||
| + | [[arquivo: bruna.jpg]] | ||
| + | |||
| + | - Exemplo de Configuração - Porta do Switch nas Vlans. | ||
| + | <syntaxhighlight lang=bash> | ||
| + | nopainnogain#enable | ||
| + | nopainnogain(config)#conf terminal | ||
| + | nopainnogain(config)#int Gi0/2 | ||
| + | nopainnogain(config-if)#switchport mode access | ||
| + | nopainnogain(config-if)#switchport access vlan 10 | ||
| + | nopainnogain(config-if)#end | ||
| + | </syntaxhighlight> | ||
| + | |||
| + | [[arquivo: bruna2.jpg]] | ||
| + | |||
| + | - Configuração da Porta Gi0/1 para mode trunk | ||
| + | <syntaxhighlight lang=bash> | ||
| + | nopainnogain#enable | ||
| + | nopainnogain(config)#conf terminal | ||
| + | nopainnogain(config)#int Gi0/1 | ||
| + | nopainnogain(config-if)#switchport mode trunk | ||
| + | nopainnogain(config-if)#switchport trunk allowed vlan add 10,20,30 | ||
| + | nopainnogain(config-if)#end | ||
| + | </syntaxhighlight> | ||
| + | |||
| + | Para Salvar as Configurações feitas: | ||
| + | <syntaxhighlight lang=bash> | ||
| + | nopainnogain#wr mem | ||
| + | </syntaxhighlight> | ||
Edição das 19h58min de 9 de dezembro de 2014

Início Dia 17/11/2014
Decidimos pelo nome da equipe "No Pain, No Gain".
Escolhemos o Sistema Operacional Centos 6.6, porém só conseguiremos instala-lo no dia 18/11.
- Informações Técnicas do Servidor:
- Processador Intel Core
- Memória RAM 1GB.
- HD 320GB.
- Placa de Rede Healtek
- Três interfaces de Rede: Onboard(1) Offboard(2)
Dia 18/11/2014
Serviços previstos:
Tivemos palestra com o Engº Patrick Soares, da empresa OI, das 19 às 20:30.
Retornamos ao Projeto Integrador na aula do Professor Fábio, de Instalação.
Tivemos problema quanto a instalação do Sistema Operacional Centos 6.6, mas no fim, conseguimos faze-la com um CD bootável. Para isso, foi preciso trocar o drive de CD da máquina do Servidor.
Instalamos os seguintes Serviços e Servidores: DHCP, DNS, PHP, MYSQL, RADIUS, APACHE
Dia 19/11/2014
Alteramos nosso Sistema Operacional para Ubuntu Server 13.04, pois o Centos 6.6 não era conhecido por todos da equipe e se tornaria mais difícil a sua configuração.
No entanto, tivemos problemas com a instalação do novo SO em nosso Servidor.
Por isso, trocamos nossa máquina Servidora:
- Informações Técnicas do Servidor:
- Processador Pentium D 1.2Ghz
- Memória RAM 1,5GB.
- HD 80GB.
- Placa de Rede Healtek
- Três interfaces de Rede: Onboard(1) Offboard(2)
Dia 20/11/2014
Conseguimos instalar o Sistema Operacional Ubuntu Server 13.04.
Dividimos nossas atividades de acordo com a tabela, abaixo:
| Tarefa | Responsável |
|---|---|
| Programação | Tiago Flores |
| DNS, WEB | Nivaldo |
| EMAIL, WEBMAIL | Joel |
| DHCP, FIREWALL, SSH | Bruna |
- Atualização do Ubuntu Server, utilizando os comandos:
 sudo apt-get update
sudo apt-get upgrade
sudo apt-get dist-upgrade.
- Instalação de alguns serviços, utilizando os comandos:
 sudo apt-get install openssh-server
sudo apt-get install bind9
sudo apt-get install apache2
sudo apt-get install isc-dhcp-server
sudo apt-get install mysql-server
Dia 21/11/2014
Tivemos quatro aulas de Cabeamento com o Professor Saul, onde pudemos realizar as seguintes atividades:
- Instalação DSLAM na sala de RedesI
- Separamos o Patch Panel, Organizadores de cabos, Switch, Bandejas do Armário e
- Definimos os 4 Pontos de Tomada (Rede e Câmera).
Dia 24/11/2014
- Configuramos o Postfix:
sudo apt-get install postfix
Quando a tela de configuração do tipo de servidor aparecer escolher a opção SITE DA INTERNET.
No campo, Nome de email do sistema: nopainnogain.sj.ifsc.edu.br.
Arquivo /etc/postfix fazer uma copia do arquivo main.cf
 cp main.cf main.cf.original
</syntaxhighlight>
- vi main.cf
</syntaxhighlight>
Apagar tudo que está no arquivo e copiar o que está abaixo e alterar apenas o que está em negrito para a configuração.
 # See /usr/share/postfix/main.cf.dist for a commented, more complete version
- Debian specific: Specifying a file name will cause the first
- line of that file to be used as the name. The Debian default
- is /etc/mailname.
- myorigin = /etc/mailname
smtpd_banner = $myhostname ESMTP $mail_name (Ubuntu)
biff = no
- appending .domain is the MUA's job.
append_dot_mydomain = no
- Uncomment the next line to generate "delayed mail" warnings
- delay_warning_time = 4h
readme_directory = no
- TLS parameters
smtpd_tls_cert_file=/etc/ssl/certs/ssl-cert-snakeoil.pem
smtpd_tls_key_file=/etc/ssl/private/ssl-cert-snakeoil.key
smtpd_use_tls=yes
smtpd_tls_session_cache_database = btree:${data_directory}/smtpd_scache
smtp_tls_session_cache_database = btree:${data_directory}/smtp_scache
- SASL
smtp_sasl_auth_enable=yes
smtp_sasl_security_options = noanonymous
smtp_sasl_password_maps = hash:/etc/postfix/saslpass
- See /usr/share/doc/postfix/TLS_README.gz in the postfix-doc package for
- information on enabling SSL in the smtp client.
myhostname = hostname_do_seu_servidor
alias_maps = hash:/etc/aliases
alias_database = hash:/etc/aliases
myorigin = /etc/mailname
mydestination = nopainnogain.sj.ifsc.edu.br, hostname_do_seu_servidor, localhost.localdomain, localhost
relayhost = smtp.nopainnogain.sj.ifsc.edu.br
mynetworks = 127.0.0.0/8 [::ffff:127.0.0.0]/104 [::1]/128
mailbox_size_limit = 0
recipient_delimiter = +
inet_interfaces = all
</syntaxhighlight>
Salvar o arquivo.
Ainda na pasta do postfix (/etc/postfix), criar um arquivo chamado saslpass com o editor de texto e adicionar a seguinte linha
 smtp.seudominio.com.brcontadeemail@seudominio.com.br:senhadaconta
</syntaxhighlight>
Salvar o arquivo e voltar para a pasta do postfix.
Compilar o arquivo.
 sudo postmap /etc/postfix/saslpass
sudo postfix reload
Por último alterar o arquivo aliases que está em /etc/ adicionando um alias para root o arquivo deve ficar igual ao exemplo abaixo.
 # See man 5 aliases for format
postmaster:    root
root: seu_email@dominio.com.br
</syntaxhighlight>
Sair do arquivo e executar os seguintes comandos:
 sudo newaliases
sudo postfix reload
Testamos o Email de acordo com o texto, abaixo:

> sudo service postfix restart
> telnet localhost 25
220 ger ESMTP postfix (Ubuntu)
helo mail
250 ger
mail from: aluno@ifsc.edu.br
250 2.1.0 OK
rcpt to: postmaster@gar.edu.br
250 2.1.5 OK
data
354 End data with <CR><LF>.<CR><LF>
subject: Teste
blabla
.
250 2.0.0 OK: queued as 71259CCA3
quit
221 2.0.0 Bye
Connection closed by foreign host
>
</syntaxhighlight>
Dia 25/11/2014
Arquivo: /etc/network/interfaces
- The loopback network interface
auto lo eth1 eth1:0 eth0 eth0.10 eth0.20 eth0.30
iface lo inet loopback
- Configuração IP Principal (Modem)
iface eth1 inet static
    address 200.135.37.121
    netmask 255.255.255.192
    gateway 200.135.37.126
- Configuração IP Secundário (Optica)
iface eth1:0 inet static
       address 200.135.37.122
       netmask 255.255.255.192
       gateway 200.135.37.126
- Configuração para Vlan
iface eth0 inet static
	address 192.168.1.21
	netmask 255.255.255.0
	gateway 192.168.1.1
- Teste Vlan1
iface eth0.10 inet static
	address 192.168.10.2
	netmask 255.255.255.128
	vlan-raw-device eth0
- Teste Vlan2
iface eth0.20 inet static
	address 192.168.20.2
	netmask 255.255.255.128
	vlan-raw-device eth0
- Teste Vlan3 - Rede Sem Fio
iface eth0.30 inet static
	address 192.168.30.2
	netmask 255.255.255.128
	vlan-raw-device eth0
</syntaxhighlight>
- Configuramos o DNS:
Arquivo: /etc/bind/named.conf.local

//
// Do any local configuration here
//
// Consider adding the 1918 zones here, if they are not used in your
// organization
//include "/etc/bind/zones.rfc1918";
//Zona de pesquisa direta
zone "nopainnogain.sj.ifsc.edu.br" {
       type master;
       file "/etc/bind/db.nopainnogain.sj.ifsc.edu.br";
};
//Zona de pesquisa reversa
zone "37.135.200.in-addr.arpa" {
      type master;
      file "/etc/bind/db.192";
</syntaxhighlight>
Arquivo: /etc/bind/db.nopainnogain.sj.ifsc.edu.br
- BIND data file for local loopback interface
$TTL    604800
@  IN   SOA     nopainnogain.sj.ifsc.edu.br. root.nopainnogain.sj.ifsc.edu.br. (
                             2         ; Serial
                        604800         ; Refresh
                         86400         ; Retry
                       2419200         ; Expire
                        604800 )       ; Negative Cache TTL
IN A 200.135.37.121
@               IN      NS      ns.nopainnogain.sj.ifsc.edu.br.
@               IN      A       200.135.37.121
@               IN      AAAA    ::1
ns              IN      A       200.135.37.121
www             IN      CNAME   200.135.37.121
</syntaxhighlight>
Arquivo: /etc/bind/db.192
- BIND reverse data file for local loopback interface
$TTL    604800
@       IN      SOA     nopainnogain.sj.ifsc.edu.br. root.napainnogain.sj.ifsc.edu.br. (
                             2         ; Serial
                        604800         ; Refresh
                         86400         ; Retry
                       2419200         ; Expire
                        604800 )       ; Negative Cache TTL
@       IN      NS      ns.
121     IN      PTR     ns.nopainnogain.sj.ifsc.edu.br.
</syntaxhighlight>
- Arquivo: /etc/resolv.conf
- Dynamic resolv.conf(5) file for glibc resolver(3) generated by resolvconf(8)
- DO NOT EDIT THIS FILE BY HAND -- YOUR CHANGES WILL BE OVERWRITTEN
nameserver 200.135.37.121
- nameserver 200.135.37.65
- nameserver 8.8.8.8
</syntaxhighlight>
- Configuramos o Apache:

NameVirtualHost *:80
<VirtualHost *:80>
DocumentRoot "/var/www/cli"
ServerName www.nopainnogain.sj.ifsc.edu.br
</virtualhost>
Alias /webmail "/usr/share/squirrelmail/"
DirectoryIndex index.php
</syntaxhighlight>
Dia 26/11/2014
- Configuramos o DHCP:
Arquivo: /etc/dhcp/dhcpd.conf
- Tempos de Aluguel
default-lease-time 600;
max-lease-time 7200;
- VLAN1 ETH0.10
subnet 192.168.10.0 netmask 255.255.255.128 {
       range 192.168.10.2 192.168.10.126;
       option broadcast-address 192.168.10.127;
       option routers 192.168.10.1;
       option domain-name-servers 200.135.37.121;
- option domain-name "nopainnogain.sj.ifsc.edu.br";
}
- VLAN2 ETH0.20
subnet 192.168.20.0 netmask 255.255.255.128 {
       range 192.168.20.2 192.168.20.126;
       option broadcast-address 192.168.20.127;
       option routers 192.168.20.1;
       option domain-name-servers 200.135.37.121;
- option domain-name "nopainnogain.sj.ifsc.edu.br";
}
- VLAN3 ETH0.30 - Rede Sem Fio
subnet 192.168.30.0 netmask 255.255.255.128 {
       range 192.168.30.2 192.168.30.126;
       option broadcast-address 192.168.30.127;
       option routers 192.168.30.1;
       option domain-name-servers 200.135.37.121;
- option domain-name "nopainnogain.sj.ifsc.edu.br";
}
- TESTE
- subnet 192.168.110.0 netmask 255.255.255.128 {
- range 192.168.110.2 192.168.110.126;
- option broadcast-address 192.168.110.127;
- option routers 192.168.110.1;
- option domain-name-servers 200.135.37.121;
- option domain-name "nopainnogain.sj.ifsc.edu.br";
}
host nopainnogain {
hardware ethernet 00:1a:4d:97:a4:63;
fixed-address 200.135.37.121;
{
</syntaxhighlight>
- Editamos a Interface que vai atender ao DHCP:
Arquivo: /etc/default/isc-dhcp-server
- Defaults for dhcp initscript
- sourced by /etc/init.d/dhcp
- installed at /etc/default/isc-dhcp-server by the maintainer scripts
- This is a POSIX shell fragment
- On what interfaces should the DHCP server (dhcpd) serve DHCP requests?
- Separate multiple interfaces with spaces, e.g. "eth0 eth1".
INTERFACES="eth1 eth1:0 eth0 eth0.10 eth0.20 eth0.30"
- eth0.10 VLAN1
- eth0.20 VLAN2
- eth0.30 VLAN3 - Rede Sem Fio
- eth1:0 IP Secundário
</syntaxhighlight>
Para Teste de funcionalidade do DHCP, utilizamos a configuração, abaixo:
- TESTE
subnet 192.168.3.0 netmask 255.255.255.0 {
       range 192.168.3.100 192.168.3.199;
       option broadcast-address 192.168.3.255;
       option routers 192.168.3.1;
       option domain-name-servers 200.135.37.65;
       option domain-name "nopainnogain.sj.ifsc.edu.br";
}
</syntaxhighlight>
Dia 27/11/2014
- Configurando o Webmail
instalando
apt-get install squirrelmail
adicionar as duas linhas abaixo no arquivo "/etc/apache2/httpd.conf":
Alias /webmail "/usr/share/squirrelmail/"
DirectoryIndex index.php
ir no diretório:
"/usr/share/squirrelmail"
depois:
"squirrelmail-configure"
vai abrir essa janela de configuração:
</syntaxhighlight>
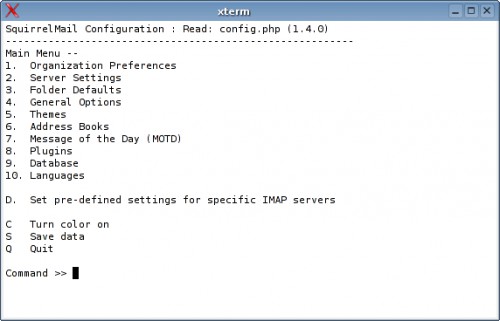
opção 1 define o nome da empresa: No Pain No Gain
opção 2 o dominio do servidor: nopainnogain.sj.ifsc.edu.br
ainda na opção 2 configurar:
3. Sendmail or SMTP : SMTP
A. Update IMAP Settings : localhost:143 (other)
B. Update SMTP Settings : localhost:25
acessar a opção D e configurar o servidor IMAP conforme o dominio: nopainnogain.sj.ifsc.edu.br
S para salvar e Q para sair
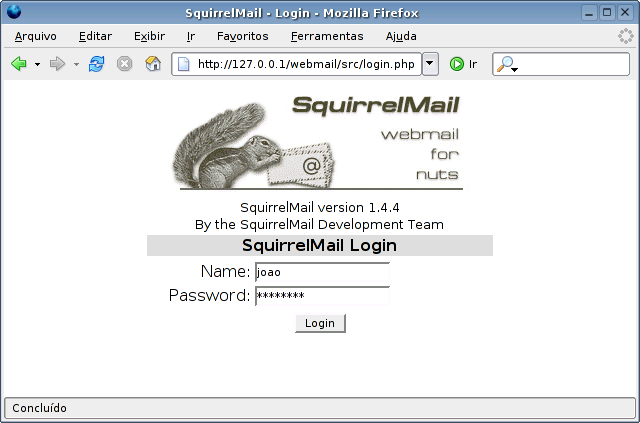
Digitando http://192.168.1.21/webmail aparecerá a tela abaixo:
</syntaxhighlight>


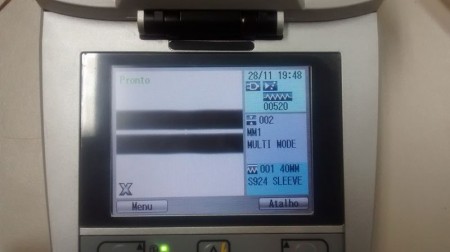
Dia 28/11/2014
Na aula de Cabeamento, demos continuidade à parte da infraestrutura do Projeto.
Segue principais atividades realizadas neste dia:
- Cabeamento que sai do Dslam (Lab. Redes) para o Patch Penel (próximo da Porta), 2 entradas (ADSL + Telefone) e 1 saída (SHDL);
- Duas Fusões de Fibra Óptica na entrada do Dio, (restam outras duas).


- Passagem de Cabo de Fibra;
- Teste em todas tomadas, Rj45 Fêmea. Estão OK;

- Instalação dos espelhos com molduras para as quatro tomadas;
- Fixação da bandeja para CFTV no Ármario.


Dia 01/12/2014
- Escolhemos as configurações do Firewall - IPTABLES.
Obs: Essa configuração será apenas para consulta. Pois a real ainda não está feita.
- PLACA DE REDE ETH0 > link de internet operadora 1
- PLACA DE REDE ETH1 > link de internet operadora 2
- PLACA DE REDE ETH2 > rede interna
Acesse as configurações padrões e insira esta abaixo:
- vi /etc/network/interface
Exemplo de configuração das placas:
- INICIO############
auto lo
iface lo inet loopback
- link de internet operadora 1############
auto eth0
iface eth0 inet static
address XXX.XXX.XXX.XXX
netmask XXX.XXX.XXX.XXX
gateway XXX.XXX.XXX.XXX
- link de internet operadora 2############
auto eth1
iface eth1 inet static
address XXX.XXX.XXX.XXX
netmask XXX.XXX.XXX.XXX
gateway XXX.XXX.XXX.XXX
- link da rede interna############
auto eth2
iface eth2 inet static
address XXX.XXX.XXX.XXX
netmask XXX.XXX.XXX.XXX
gateway XXX.XXX.XXX.XXX
- FINAL############
Após as devidas configurações nas placas de redes, temos que baixar todos os pacotes necessários para a
instalação de qualquer programa no sistema, com o usuário administrador “ROOT”, damos o seguinte comando:
- apt-get update && apt-get install vim
Após as atualizações damos inicio a configuração do script do firewall, vamos utilizar um script já pré configurado,
mas antes temos que criar o arquivo e dar as permissões para execução:
- vi /etc/init.d/firewall
Permissões e colocar o script para executar como programa:
- chmod 777 /etc/init.d/firewall
- chmod +x /etc/init.d/firewall
Vamos agora inserir o script pré configurado com o seguinte comando:
- vi /etc/init.d/firewall
Agora vamos inserir o script:
- INICIO############
- !/bin/bash
- INTERFACES DOS LINKS DE INTERNET############
LINK01="eth0"
LINK02="eth1"
- INTERFACE DA REDE INTERNA############
INTERNA="eth2"
- FAIXA DA REDE INTERNA############
REDEINTERNA="XXX.XXX.XXX.XXX/XX"
- IP DA INTERFACE ETH0############
IP_LINK01="XXX.XXX.XXX.XXX/XX"
- IP DA INTERFACE ETH1############
IP_LINK02="XXX.XXX.XXX.XXX./XX"
- PORTAS LIBERADAS############
PORTAS_TCP="22,3128,80,21,3390,139,445,443,81,110,587,3389"
- PORTAS_UDP="53,137,138,30606,3299"############
PORTAS_INTERNAS="20,21,22,3389,110,143,993,995,25,465,53,85,443,119"
- PORTA PARA ACESSO REMOTO VIA TS############
PORTA_TS="3389"
- PORTA TS DOS SERVIDORES############
PORTA_TS_SERVIDOR01="XXXX"
- PORTA PARA ACESSO REMOTO VIA SSH############
PORTA_SSH_EXTERNO="XXXX"
PORTA_SSH_INTERNO="22"
IP_SERVER_SSH="XXX.XXX.XXX.XXX"
- IP DO SERVIDOR 01############
IP_SERVIDOR01="XXX.XXX.XXX.XX"
- IPS LIBERADOS DO PROXY############
IPS_LIBERADOS="XXX.XXX.XXX.XXX/XXX.XXX.XXX"
- SERVIDOR SQUID .SERVIDOR PROXY.############
IP_SQUID="XXX.XXX.XXX.XXX"
- INICIO DAS REGRAS############
- Inicia as Configurações############
iniciar(){
- Zerando as regras############
iptables -Z
iptables -X
iptables -F INPUT
iptables -F OUTPUT
iptables -F FORWARD
iptables -F POSTROUTING -t nat
iptables -F PREROUTING -t nat
iptables -F -t nat
iptables -t nat -F
iptables -t mangle -F
echo "Limpando as regras ...................................[ OK ]"
- Ativa modulos no Kernel############
modprobe ip_conntrack
modprobe ip_conntrack_ftp
modprobe ip_nat_ftp
modprobe ipt_LOG
modprobe ipt_REJECT
modprobe ipt_MASQUERADE
modprobe ip_tables
modprobe iptable_filter
modprobe nf_conntrack_ipv4
echo "Modulos Ativados .....................................[ OK ]"
- CRIA IDA E VOLTA DO ACESSO NAS CHAINS INPUT, OUTPUT E FORWARD############
iptables -A INPUT -m state --state ESTABLISHED,RELATED -j ACCEPT
iptables -A OUTPUT -m state --state RELATED,ESTABLISHED -j ACCEPT
iptables -A FORWARD -m state --state ESTABLISHED,RELATED -j ACCEPT
- ATRIBUINDO SEGURANCA############
echo 1 > /proc/sys/net/ipv4/tcp_syncookies
- Rejeitar requisicao de ICMP Echo destinado a Broadcasts e Multicasts
echo 1 > /proc/sys/net/ipv4/icmp_echo_ignore_broadcasts
- Proteção Contra IP Spoofing############
echo 1 > /proc/sys/net/ipv4/conf/all/rp_filter
- Ativando proteção contra responses bogus############
echo 1 > /proc/sys/net/ipv4/icmp_ignore_bogus_error_responses
- Permite o redirecionamento seguro dos pacotes############
echo 0 > /proc/sys/net/ipv4/conf/all/accept_redirects
- Protege contra port scanners avançadas############
iptables -A FORWARD -p tcp --tcp-flags SYN,ACK,FIN,RST RST -m limit --limit 1/s -j ACCEPT
- Protege contra ping da morte############
iptables -A FORWARD -p icmp --icmp-type echo-request -m limit --limit 1/s -j ACCEPT
- Protege contra os ataques do tipo "Syn-flood, DoS, etc"############
iptables -A FORWARD -p tcp -m limit --limit 1/s -j ACCEPT
- Logar os pacotes mortos por inatividade############
iptables -A FORWARD -m limit --limit 3/minute --limit-burst 3 -j LOG
- Protege contra pacotes que podem procurar e obter informacoes da rede interna
iptables -A FORWARD --protocol tcp --tcp-flags ALL SYN,ACK -j DROP
- Bloqueando traceroute############
iptables -A INPUT -p udp -s 0/0 -i $INTERNA --dport 33435:33525 -j DROP
- Proteções contra ataques############
iptables -A INPUT -m state --state INVALID -j DROP
- Bloqueia qualquer tentativa de conexão de fora para dentro por TCP############
iptables -A INPUT -i $INTERNA -p tcp --syn -j DROP
- Mesmo assim fechar todas as portas abaixo de 32000############
iptables -A INPUT -i $INTERNA -p tcp --dport :32000 -j DROP
- Proteções contra ataques############
iptables -A INPUT -m state --state INVALID -j DROP
- FIM DA SEGURANCA############
- Liberando encaminhamento de pacotes############
echo 1 > /proc/sys/net/ipv4/ip_forward
- PREROUTING############
- ESTA REGRA LIBERA O IPS DO PROXY############
iptables -t nat -A PREROUTING -s $IPS_LIBERADOS -p tcp --dport 80 -j ACCEPT
- REGRA PARA ACESSO VIA TERMINAL SERVER############
- SERVIDOR 01############
iptables -t nat -A PREROUTING -d $IP_LINK01 -p tcp -m tcp --dport $PORTA_TS_SERVIDOR01 -j DNAT --to-destination $IP_SERVIDOR01:$PORTA_TS
- REGRA PARA ACESSO VIA PROTOCOLO SSH############
iptables -t nat -A PREROUTING -d $IP_LINK01 -p tcp -m tcp --dport $PORTA_SSH_EXTERNO -j DNAT --to-destination $IP_SERVER_SSH:$PORTA_SSH_INTERNO
- Regras FORWARD PORTAS LIBERADAS PARA REDE INTERNA############
iptables -A FORWARD -s $REDEINTERNA -p tcp -m multiport --dports $PORTAS_INTERNAS -j ACCEPT
- REGRA COMPARTILHAMENTO DOS LINKS############
- INTERNET NOS LINKS EXTERNO PARA REDE INTERNA############
iptables -t nat -A POSTROUTING -o $LINK01 -j MASQUERADE
iptables -t nat -A POSTROUTING -o $LINK02 -j MASQUERADE
echo "Compartilhamento de Internet Ativados ................[ OK ]"
- REGRAS DE LIBERACAO DE PORTAS############
- REGRAS DE LIBERACAO DE PORTAS TCP############
iptables -A INPUT -p tcp -m multiport --dports $PORTAS_TCP -j ACCEPT
iptables -A OUTPUT -p tcp -m multiport --dports $PORTAS_TCP -j ACCEPT
iptables -A FORWARD -p tcp -m multiport --dports $PORTAS_TCP -j ACCEPT
- REGRAS DE LIBERACAO DE PORTAS UDP############
iptables -A INPUT -p udp -m multiport --dports $PORTAS_UDP -j ACCEPT
iptables -A OUTPUT -p udp -m multiport --dports $PORTAS_UDP -j ACCEPT
iptables -A FORWARD -p udp -m multiport --dports $PORTAS_UDP -j ACCEPT
- FIM LIBERACAO DE PORTAS############
- REGRA PARA SERVIDOR PROXY "SQUID SERVIDOR SEPARADO"############
iptables -t nat -A PREROUTING -i $INTERNA -p tcp --dport 80 -j DNAT --to-destination $IP_SQUID:3128
- Manter Conexar estabelecidas############
iptables -A INPUT -m state --state ESTABLISHED,RELATED -j ACCEPT
iptables -A FORWARD -m state --state ESTABLISHED,RELATED -j ACCEPT
- Liberando o Trafego na Interface loopback############
iptables -A INPUT -i lo -j ACCEPT
- REGRA QUE BLOQUEIA TUDO O QUE NAO ESTA ACIMA############
echo "Bloqueando tudo que restou.."
iptables -A INPUT -p tcp -j DROP
iptables -A INPUT -p udp -j DROP
iptables -A FORWARD -i $LINK01 -p tcp -j DROP
iptables -A FORWARD -i $LINK01 -p udp -j DROP
iptables -A FORWARD -i $LINK02 -p tcp -j DROP
iptables -A FORWARD -i $LINK02 -p udp -j DROP
echo "Firewall iniciando!"
}
parar(){
iptables -F -t nat
}
case "$1" in
"start") iniciar ;;
"stop") parar ;;
"restart") parar; iniciar ;;
- ) echo "Use os parâ ou stop"
esac
- FIM DAS REGRAS############
OBSERVAÇÂO:
Após configurar o firewall temos que colocar o script para iniciar no boot do sistema com o seguinte comando:
- update-rc.d firewall defaults
</syntaxhighlight>
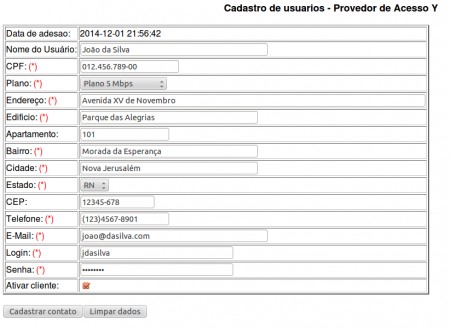
PROGRAMAÇÃO
- O aluno Tiago já está adiantando a parte de Programação.
Já estão Prontos: Cadastro + Listagem.
Faltando apenas: Exclusão + Alterar Usuário.
- Instalando/Configurando Freeradius

apt-get update && apt-get -y install freeradius freeradius-common freeradius-mysql freeradius-utils libfreeradius2

mysql -uroot -p -e 'CREATE DATABASE radius; GRANT ALL ON radius.* TO radius@localhost IDENTIFIED BY "PASSWORD";'

mysql -uroot -p radius < /etc/freeradius/sql/mysql/schema.sql
Configurando arquivo /etc/freeradius/sql.conf
- -*- text -*-
- $Id$
- Configuration for the SQL module
- The database schemas and queries are located in subdirectories:
- sql/DB/schema.sql Schema
- sql/DB/dialup.conf Basic dialup (including policy) queries
- sql/DB/counter.conf counter
- sql/DB/ippool.conf IP Pools in SQL
sql {
       #
       #  Set the database to one of:
       driver = "rlm_sql_${database}"
       # If you are using Oracle then use this instead
       acct_table2 = "radacct"
       authcheck_table = "radcheck"
       authreply_table = "radreply"
       groupcheck_table = "radgroupcheck"
       groupreply_table = "radgroupreply"
       # Table to keep group info
       usergroup_table = "radusergroup"
# If set to 'yes' (default) we read the group tables
- -*- text -*-
- $Id$
- Configuration for the SQL module
- The database schemas and queries are located in subdirectories:
- sql/DB/schema.sql Schema
sql {
       #
       # Database table configuration for everything except Oracle
       acct_table1 = "radacct"
       # Allow for storing data after authentication
       postauth_table = "radpostauth"
       # If set to 'no' the user MUST have Fall-Through = Yes in the radreply table
       # read_groups = yes
       # Remove stale session if checkrad does not see a double login
       deletestalesessions = yes
       # Print all SQL statements when in debug mode (-x)
       sqltrace = no
       sqltracefile = ${logdir}/sqltrace.sql
       # number of sql connections to make to server
       num_sql_socks = 5
       # number of seconds to dely retrying on a failed database
       # connection (per_socket)
       connect_failure_retry_delay = 60
       # lifetime of an SQL socket.  If you are having network issues
       # such as TCP sessions expiring, you may need to set the socket
       # lifetime.  If set to non-zero, any open connections will be
       # closed "lifetime" seconds after they were first opened.
       lifetime = 0
       # Maximum number of queries used by an SQL socket.  If you are
       # having issues with SQL sockets lasting "too long", you can
       # limit the number of queries performed over one socket.  After
       # "max_qeuries", the socket will be closed.  Use 0 for "no limit".
       max_queries = 0
       # Set to 'yes' to read radius clients from the database ('nas' table)
       # Clients will ONLY be read on server startup.  For performance
       # and security reasons, finding clients via SQL queries CANNOT
       # be done "live" while the server is running.
       #
       #readclients = yes
       # Table to keep radius client info
       nas_table = "nas"
       # Read driver-specific configuration
       $INCLUDE sql/${database}/dialup.conf
</syntaxhighlight>
No arquivo /etc/freeradius/radiusd.conf
Descomentar as linhas

uncomment $INCLUDE sql.conf
uncomment $INCLUDE sql/mysql/counter.conf
</syntaxhighlight>
No arquivo /etc/freeradius/sites-available/default
Descomentar as linhas

authorize {
accounting {
session {
</syntaxhighlight>
Randomizar os segredos

sed -i "s/testing123/fznEBkoaZKcJg5VeJFXEwf3L7um4bexPnzLcAY6VAvUBEXBvdReRRDYrbWZJ3Zxl/" /etc/freeradius/clients.conf
</syntaxhighlight>
Adicionar limites de uso e de taxa com o Dicionário FreeRADIUS

echo -e "\nATTRIBUTE Usage-Limit 3000 string\nATTRIBUTE Rate-Limit 3001 string" >> /etc/freeradius/dictionary
</syntaxhighlight>
Restart Freeradius

service freeradius restart
</syntaxhighlight>
Dia 02/12/2014
Atividades:
Terminamos as duas Fusões de Fibra Óptica que faltavam.
Instalação do Patch Panel no Armário do Redes: Meios.
Teste nas Fibras Ópticas, estão OK.
Dia 03/12/2014
Tivemos problemas quanto a configuração das Vlans. Mas, já atualizamos o diário.
Dia 04/12/2014
Configuração no Switch Catalyst 2960-S das Vlans.
Dia 05/12/2014
Continuamos configurando as Vlans no Switch Catalyst 2960-S.
Configurando Senhas de Acesso:

- Exemplo de Configuração - Porta do Switch nas Vlans.

nopainnogain#enable
nopainnogain(config)#conf terminal
nopainnogain(config)#int Gi0/2
nopainnogain(config-if)#switchport mode access
nopainnogain(config-if)#switchport access vlan 10
nopainnogain(config-if)#end
- Configuração da Porta Gi0/1 para mode trunk

nopainnogain#enable
nopainnogain(config)#conf terminal
nopainnogain(config)#int Gi0/1
nopainnogain(config-if)#switchport mode trunk
nopainnogain(config-if)#switchport trunk allowed vlan add 10,20,30
nopainnogain(config-if)#end
Para Salvar as Configurações feitas:
nopainnogain#wr mem